Jekyll 블로그란?
Jekyll 은 아주 심플하고 블로그 지향적인 정적 사이트 생성기입니다. Jekyll 은 다양한 포맷의 원본 텍스트 파일을 템플릿 디렉토리로부터 읽어서, (Markdown 등의) 변환기와 Liquid 렌더러를 통해 가공하여, 당신이 즐겨 사용하는 웹 서버에 곧바로 게시할 수 있는, 완성된 정적 웹사이트를 만들어냅니다. 그리고 Jekyll 은 GitHub Pages 의 내부 엔진이기도 합니다. 다시 말해, Jekyll 을 사용하면 자신의 프로젝트 페이지나 블로그, 웹사이트를 무료로 GitHub 에 호스팅 할 수 있다는 뜻입니다.
Ruby 설치
Jekyll 은 Ruby로 만들어졌으므로 지킬 블로그를 로컬에서 테스트하기 위해서는 Ruby를 설치해야한다.
로컬 패키지 목록 업데이트
먼저 아래 명령으로 로컬의 패키지 목록을 업데이트한다.
sudo apt-get update
Ruby 의존성 패키지 설치
다음으로 아래의 명령을 입력해서 Ruby 설치에 필요한 의존성 패키지들을 설치한다.
sudo apt-get install autoconf bison build-essential libssl-dev libyaml-dev libreadline6-dev zlib1g-dev libncurses5-dev libffi-dev libgdbm3 libgdbm-dev
Ruby 버전관리 프로그램 rbenv 설치
Ruby의 버전관리 프로그램인 rbenv 를 설치한다.
git clone https://github.com/rbenv/rbenv.git ~/.rbenv
rbenv 실행 환경변수 설정
아래 명령어를 실행해서 rbenv 환경변수를 설정해준다.
echo 'export PATH="$HOME/.rbenv/bin:$PATH"' >> ~/.bashrc
echo 'eval "$(rbenv init -)"' >> ~/.bashrc
zsh 을 사용하는 경우에는 아래 명령을 실행한다.
echo 'export PATH="$HOME/.rbenv/bin:$PATH"' >> ~/.zshrc
echo 'eval "$(rbenv init -)"' >> ~/.zshrc
혹은 직접 .bashrc 또는 .zshrc 파일을 열어 다음을 입력해주어도 된다.
export PATH="$HOME/.rbenv/bin:$PATH
eval "$(rbenv init -)"
환경변수를 설정해준 다음에는 터미널을 재시작하거나 아래 명령어를 입력해서 추가된 환경변수를 적용시킨다.
source ~/.bashrc
zsh인 경우
source ~/.zshrc
rbenv 정상 작동 확인
환경변수 적용이 끝났다면 터미널에서 아래와 같이 입력하여 rbenv 설치가 되었는지 확인한다.
rbenv
rbenv 1.1.1-28-gb943955
Usage: rbenv <command> [<args>]

Some useful rbenv commands are:
   commands    List all available rbenv commands
   local       Set or show the local application-specific Ruby version
   global      Set or show the global Ruby version
   shell       Set or show the shell-specific Ruby version
   rehash      Rehash rbenv shims (run this after installing executables)
   version     Show the current Ruby version and its origin
   versions    List all Ruby versions available to rbenv
   which       Display the full path to an executable
   whence      List all Ruby versions that contain the given executable

See `rbenv help <command>' for information on a specific command.
For full documentation, see: https://github.com/rbenv/rbenv#readme
ruby-build 플러그인 설치
rbenv로 Ruby를 설치하기 위해서는 ruby-build 플러그인이 필요하다. 아래 명령으로 설치한다.
git clone https://github.com/rbenv/ruby-build.git ~/.rbenv/plugins/ruby-build
이제 다시 rbenv 를 입력해보면 명령어 목록에 install 과 uninstall 이 추가되어 있는 것을 볼 수 있다.
rbenv
rbenv 1.1.1-28-gb943955
Usage: rbenv <command> [<args>]

Some useful rbenv commands are:
   commands    List all available rbenv commands
   local       Set or show the local application-specific Ruby version
   global      Set or show the global Ruby version
   shell       Set or show the shell-specific Ruby version
   install     Install a Ruby version using ruby-build
   uninstall   Uninstall a specific Ruby version
   rehash      Rehash rbenv shims (run this after installing executables)
   version     Show the current Ruby version and its origin
   versions    List all Ruby versions available to rbenv
   which       Display the full path to an executable
   whence      List all Ruby versions that contain the given executable

See `rbenv help <command>' for information on a specific command.
For full documentation, see: https://github.com/rbenv/rbenv#readme
Ruby 설치하기
다음 명령어로 설치가능한 Ruby 버전을 확인한다.
rbenv install -l (소문자 L)
2018년 1월 17일 기준 가장 최신 버전은 2.5.0 버전이므로 아래와 같이 입력하여 설치해준다.
rbenv install 2.5.0
그 다음 아래 명령어로 설치한 2.5.0 버전 Ruby를 전역적으로 사용하도록 설정한다.
rbenv global 2.5.0
아래 명령어로 Ruby의 버전확인을 하여 2.5.0 이 표시되는 것을 확인한다.
ruby -v
Jekyll 블로그에 필요한 Gem 설치
bundler 설치
gem은 Ruby의 패키지를 뜻한다. gem은 기본적으로 RubyGems 에 의해 관리되지만 패키지 의존성 문제 때문에 bundler 라는 패키지 관리 프로그램을 사용한다.
아래 명령어로 bundler 를 설치한다.
gem install bundler
github-pages 설치
Jekyll 블로그는 Github-Page 라는 정적 웹 사이트 렌더링 서비스를 사용한다.
github-pages 는 Jekyll 블로그가 Github 상에서 잘 렌더링 되는데 필요한 의존성 패키지들이다.
gem install github-pages
jekyll 설치
마지막으로 jekyll을 설치한다.
gem install jekyll
로컬에서 Jekyll 블로그 시작하기
새 블로그 생성
지킬 블로그를 시작하기 위해서는 원하는 디렉토리로 이동한 다음 아래 명령어를 실행한다.
jekyll new 블로그이름
예를 들어 project 라는 폴더에서 myblog 라는 이름으로 만들었다면 아래와 같은 폴더에 블로그가 생성된다.
project/myblog
폴더 안에는 아래와 같은 파일들이 생성된다.
404.html
Gemfile
Gemfile.lock
_config.yml
_posts/
about.md
index.md
Github-Page 세팅
우선 Gemfile 이라는 파일을 열어서 몇가지 수정해준다.
vim Gemfile
먼저 gem "jekyll", "~> 3.7.0" 이라고 쓰인 부분을 커멘트 처리한다.
...
# This will help ensure the proper Jekyll version is running.
# Happy Jekylling!
# gem "jekyll", "~> 3.7.0"

...
그 다음 커맨트 처리되어 있는 gem "github-pages", group: :jekyll_plugins 부분을 커맨트 처리 해제하고 저장한다.
...
# If you want to use GitHub Pages, remove the "gem "jekyll"" above and
# uncomment the line below. To upgrade, run `bundle update github-pages`.
gem "github-pages", group: :jekyll_plugins

...
변경 내용을 저장하고 파일을 닫은 다음 아래 명령어로 변경사항을 적용시킨다.
bundle install
bundle update
로컬 테스트 서버 실행하기
블로그가 있는 폴더에서 아래 명령을 실행하여 로컬 테스트 서버를 실행한다.
bundle exec jekyll serve
브라우저에서 http://127.0.0.1:4000/ 로 접속해보면 블로그가 생성되어 있는 것을 확인할 수 있다.
Github에 블로그 업로드하기
Github-Page User site 저장소 생성하기
Github에서 새로운 저장소를 생성한다.
이 때, 새로운 저장소 이름은 반드시 사용자명.github.io 으로 한다.
예를 들어, 사용자명이 nachwon 인 경우 nachwon.github.io 라는 이름으로 저장소를 생성한다.
로컬 저장소 생성 및 연결
Jekyll 블로그를 생성했던 폴더로 이동해서 로컬 git 저장소를 시작한다.
git init
아래 명령어로 로컬 저장소와 리모트 저장소를 연결한다.
git remote add origin 리모트저장소주소
로컬 저장소 파일 업로드
아래 명령어들을 실행하여 블로그를 Github의 리모트 저장소에 배포한다.
git add -A
git commit -m '커밋 메세지'
git push origin master
앞으로 새로운 글을 쓰는 등 블로그에 변경사항이 생길 경우 위의 명령어들을 실행하여 변경사항을 리모트 저장소에 배포해주면 된다.
업로드를 하고나면 아래의 주소로 블로그에 접속할 수 있게 된다.
https://사용자명.github.io
기본적인 사용법
초기 세팅
블로그를 만들고 나면 먼저 기본 세팅들을 설정해주어야 한다.
설정들은 _config.yml 파일에 들어있다.
vim _config.yml
파일의 아래 부분을 수정해준다.
...
title: 블로그 이름
email: 블로그 관리자 메일 주소
description: >- # this means to ignore newlines until "baseurl:"
  블로그 소개글
baseurl: "" # the subpath of your site, e.g. /blog
url: "" # the base hostname & protocol for your site, e.g. http://example.com
twitter_username: 트위터계정명
github_username:  Github계정명
...
위 설정들을 입력하고 나면 아래와 같이 설정한 내용들이 블로그에 표시되도록 업데이트 된다.
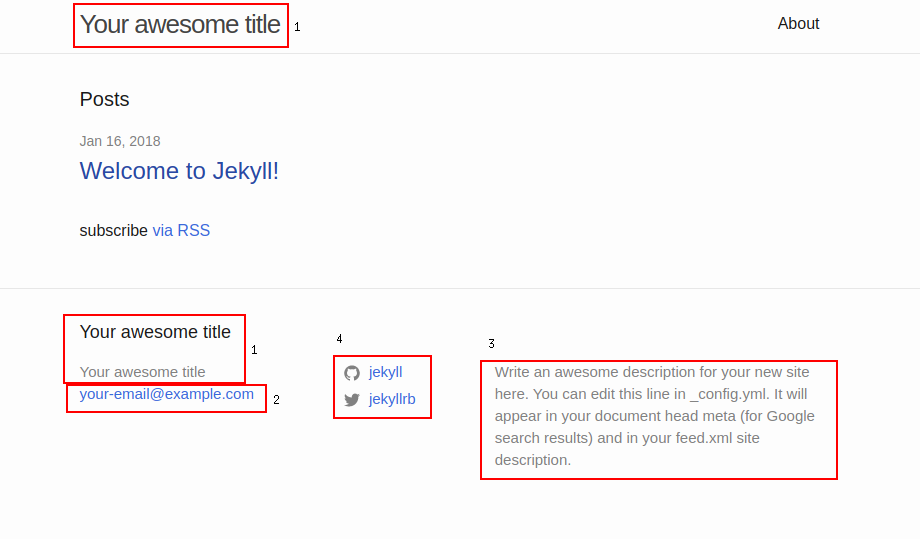
1 - 블로그 이름
2 - 블로그 관리자 메일 주소
3 - 블로그 소개글
4 - 트위터, 깃헙 계정명
블로그 글 작성하기
블로그의 글은 _posts 폴더에 작성하며 아래와 같이 반드시 YYYY-MM-DD-제목.md 의 형식으로 파일 이름을 지정해야한다.
_posts/2018-01-16-newpost.md
지킬 블로그에 대한 더 자세한 설명은 공식 페이지를 참고한다.
Reference
Digital Ocean: https://www.digitalocean.com/community/tutorials/how-to-install-ruby-on-rails-with-rbenv-on-ubuntu-16-04
이한영 강사님 블로그: https://lhy.kr/create-jekyll-blog-using-rbenv-and-github-pages
지킬블로그 공식페이지: https://jekyllrb-ko.github.io/