지난 포스트에서 블로그 메인 화면 템플릿을 만들었었다. 이제 이 템플릿을 CSS 로 예쁘게 꾸며보도록 하자.
static 폴더 생성
블로그를 꾸미기 위해서는 CSS 파일이 필요하다. CSS 와 같은 파일들을 정적 (Static) 파일이라고 한다. 템플릿을 template 폴더에 모두 모아놓고 관리했듯이, 정적 파일들을 static 이라는 폴더에 모아놓고 관리하도록 하자.
블로그 꾸미기에 부트스트랩을 사용할 것이다. 우선 Bootstrap에서 부트스트랩 파일들을 다운로드 하자. 부트스트랩 폴더 안에는 미리 만들어져있는 CSS, Javascript 그리고 fonts 파일들이 들어있다. myproject 폴더 바로 아래에 static 이라는 폴더를 생성하고 그 안에 다운받은 부트스트랩 폴더를 넣어준다.
myproject
├── blog
├── config
├── db.sqlite3
├── manage.py
├── static
│   └── bootstrap
│       ├── css
│       │   ├── bootstrap.css
│       │   ├── bootstrap.css.map
│       │   ├── bootstrap.min.css
│       │   ├── bootstrap-theme.css
│       │   ├── bootstrap-theme.css.map
│       │   └── bootstrap-theme.min.css
│       ├── fonts
│       │   ├── glyphicons-halflings-regular.eot
│       │   ├── glyphicons-halflings-regular.svg
│       │   ├── glyphicons-halflings-regular.ttf
│       │   ├── glyphicons-halflings-regular.woff
│       │   └── glyphicons-halflings-regular.woff2
│       └── js
│           ├── bootstrap.js
│           ├── bootstrap.min.js
│           └── npm.js
└── templates
static 폴더 연결하기
지난번에 template 폴더의 경로를 settings.py 에 입력해주었던 것을 기억하는가? 그 과정을 static 폴더에도 똑같이 해주어야 한다.
settings.py 를 열고 아래와 같이 입력하여 static 폴더의 경로 변수를 만들어 준다.
STATIC_DIR = os.path.join(BASE_DIR, 'static')
템플릿 폴더의 경로인 TEMPLATE_DIR 을 TEMPLATES 의 DIRS 키에 넣어주었듯이 static 폴더도 동일하게 해주어 Django 에 인식시켜야한다. static 폴더의 경우는 아래와 같이 입력한다.
STATICFILES_DIRS = [
    STATIC_DIR,
]
이렇게 해주면 Django 가 정적 파일들을 불러올 때 STATICFILES_DIRS 안에 포함된 경로에서 정적 파일들을 불러오게 된다.
CSS 파일 적용하기
이제 static 폴더 안의 CSS 파일들을 템플릿에 적용시켜보자.
post_list.html 을 열고 head 안에 아래와 같이 link 태그를 입력해준다.
<head>
    <meta charset="UTF-8">
    <meta name="viewport"
          content="width=device-width, user-scalable=no, initial-scale=1.0, maximum-scale=1.0, minimum-scale=1.0">
    <meta http-equiv="X-UA-Compatible" content="ie=edge">
    <link rel="stylesheet" href="{% static 'bootstrap/css/bootstrap.css' %}">  # link 태그 삽입
    <title>Post_list</title>
</head>
link 태그의 href 속성에 적용하려는 정적 파일들의 경로를 설정해주어야 한다.
정적 파일의 경로를 불러올 때는 {% static %} 템플릿 태그를 사용한다. {% static 'bootstrap/css/bootstrap.css' %} 는 STATICFILES_DIRS 에 입력한 경로로부터 시작해서 bootstrap/css/ 폴더안의 bootstrap.css 파일을 가리킨다.
{% static %} 태그는 기본적으로 포함되어 있는 템플릿 태그가 아니기 때문에 따로 불러와주어야 한다.
템플릿 파일 제일 윗 줄에 아래와 같이 입력해주자.
{% load static %}
<!doctype html>
<html lang="en">
...
이제 runserver 를 실행해 확인해보자.
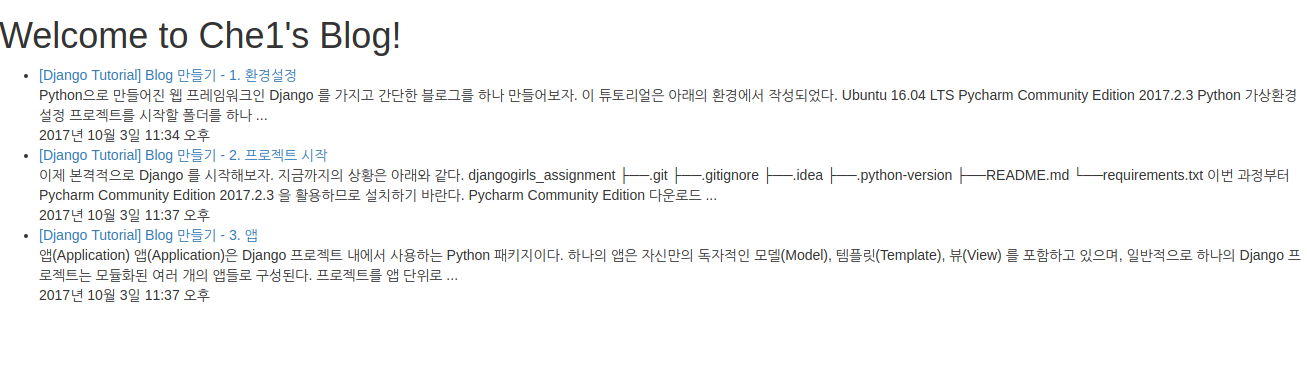
이 화면은 부트스트랩 적용 전 화면이고,

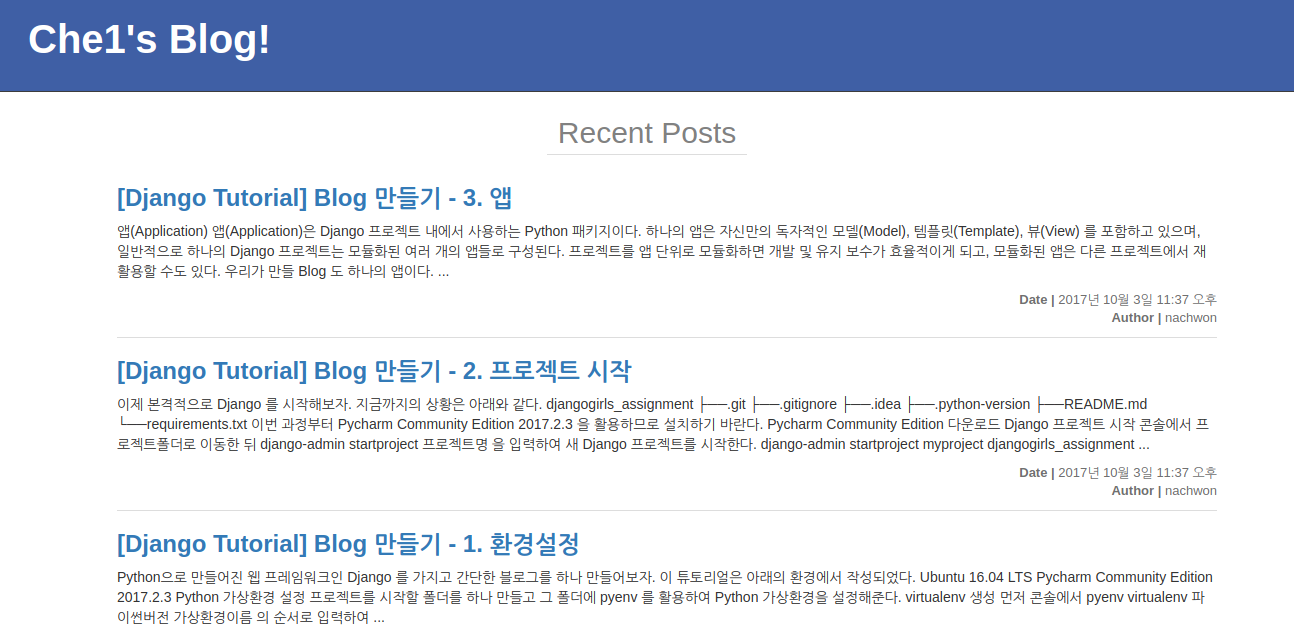
이 화면은 부트스트랩이 적용된 후이다. 서식들이 부트스트랩 기본 서식으로 바뀐 것을 볼 수 있다.
부트스트랩과는 별개로 서식을 바꿔줄 CSS 파일을 하나 추가해보자.
static 폴더 바로 아래에 css 폴더를 만들고 그 안에 blog.css 파일을 생성하자.
static
├── bootstrap
└── css
    └── blog.css
그리고 post_list.html 템플릿에서 아래의link 태그를 추가해준다.
<link rel="stylesheet" href="{% static 'bootstrap/css/bootstrap.css' %}">
<link rel="stylesheet" href="{% static 'css/blog.css' %}">
큰 서식은 부트스트랩을 이용해 잡아주고, 세세한 서식을 커스터마이징 할 때 blog.css 파일을 활용하면 될 것이다.
이제 템플릿을 꾸밀 준비를 마쳤으니 마음껏 꾸며보도록 하자. 부트스트랩과 CSS 사용법은 생략하도록 한다.
아래는 간단히 블로그를 꾸민 모습이다.
아래는 post_list.html 과 blog.css 파일 전체 내용이다.
# post_list.html

{% load static %}
<!doctype html>
<html lang="en">
<head>
    <meta charset="UTF-8">
    <meta name="viewport"
          content="width=device-width, user-scalable=no, initial-scale=1.0, maximum-scale=1.0, minimum-scale=1.0">
    <meta http-equiv="X-UA-Compatible" content="ie=edge">
    <link rel="stylesheet" href="{% static 'bootstrap/css/bootstrap.css' %}">
    <link rel="stylesheet" href="{% static 'css/blog.css' %}">
    <title>Post_list</title>
</head>
<body>
    <div class="header">
            <h1>Che1's Blog!</h1>
    </div>
    <div class="recent">Recent Posts</div>
    <div class="container">
        <ul class="list">
            {% for post in posts %}
            <li class="item">
                <h3><a href="">{{ post.title }}</a></h3>
                <div class="content">{{ post.content|truncatewords:50 }}</div>
                <div class="info">
                    <div class="published-date"><span>Date | </span>{{ post.published_date }}</div>
                    <div class="author"><span>Author | </span>{{ post.author }}</div>
                </div>

            </li>
            {% endfor %}
        </ul>
    </div>
</body>
</html>
# blog.css

.header {
    background-color: #3F5FA5;
    color: white;
    padding: 20px 30px;
    border-bottom: 1px solid #3D3D3D;
    margin-bottom: 20px;

}

.header h1 {
    font-size: 40px;
    font-weight: bolder;
    margin: 0;
    margin-bottom: 10px;
    padding: 0;
}

.recent {
    text-align: center;
    width: 200px;
    margin: 10px auto;
    font-size: 30px;
    font-weight: lighter;
    color: #818181;
    border-bottom: 1px solid #ddd;
}

a:hover {
    text-decoration: none;
}

.item{
    overflow: hidden;
    padding-bottom: 10px;
    border-bottom: 1px solid #ddd;
}

.item h3 {
    font-weight: bolder;
}

.info {
    display: inline-block;
    float: right;
    font-size: 13px;
    color: #707070;
    margin-top: 10px;
}

.info span {
    font-weight: bold;
}

.author {
    float: right;
}
CSS 파일이 적용이 안될 때
CSS 파일을 수정하던 중 수정한 파일이 runserver 에 업데이트 되지 않는 현상이 발생했다.
심지어 blog.css 파일을 없애도 아무 에러없이 멀쩡히 작동하는 것을 볼 수 있었다.
CSS 파일을 캐시에 저장해두고 쓰는 바람에 생기는 문제인 것 같다. 이런 경우 크롬에서 ctrl + shift + del 을 눌러 캐시를 삭제해주면 다시 정상적으로 CSS 파일이 작동한다.
이어지는 포스트에서는 블로그에 글 자세히 보기 페이지와 글 추가, 삭제 등 여러가지 기능들을 추가해볼 것이다.
Reference
이한영 강사님 강의자료
Djangogirls: https://tutorial.djangogirls.org/ko/
Bootstrap 공식 페이지: http://bootstrapk.com/